

Almost all of the web applications uses datatables to listing data. With using jQuery Datatables you can create powerful and manageable datatables. Then why using yajra datatables? Rendering data from the server-side with jQuery Datatables is complex and unstructured. With, Yajra Datatables Laravel you can easily create server-side rendering. So let’s get started.
Post Contents
# Requirements
- Laravel installed in your system. Click Here to know how to install Laravel Framework.
Yajra provides lots of functionalities. Official documentaion can be found here. Make sure you are using perfect version of yajra datatables with laravel. Check compitable version here.
# Installing Yajra Datatables Laravel Package
I’m using laravel 6.2 which is compatible with 9.0. Change it to your needs.
composer require yajra/laravel-datatables-oracle:^9.0Open app.php and then add service provider into following array.
/* config > app.php */

'providers' => [
    Yajra\DataTables\DataTablesServiceProvider::class,
]
Similarly, add class alias to following array.
'aliases' => [
    'DataTables' => Yajra\DataTables\Facades\DataTables::class,
]
Use the following command to publish configuration
php artisan vendor:publish --tag=datatables# Database Seeding (Optional)
After completing setup, let’s seed database with 1000 articles for testing.
We need Article model and its migration. Also, we need ArticlesTableSeeder to write seeding logic.
php artisan make:model Article -mUsing -m will automatically create migration for given model.
Create schema for articles table, update following code in up function.
/* database > migrations > *_create_articles_table.php */

Schema::create('articles', function (Blueprint $table) {
    $table->bigIncrements('id');
    $table->string('title');
    $table->text('description');
    $table->string('published_by');
    $table->timestamps();
});
Similarly, create seeder with following command. It will create file in database > seeds folder.
php artisan make:seeder ArticlesTableSeederWrite logic into seeder class for articles. Laravel inbuilt faker package provides lots of functions to create dummy data.
/* database > seeds > ArticlesTableSeeder.php */

<?php

use Illuminate\Database\Seeder;
use App\Article;
use Faker\Factory as Faker;

class ArticlesTableSeeder extends Seeder
{
    public function run()
    {
        $faker = Faker::create();

        foreach(range(1, 1000) as $index)
        {
            Article::create([
                'title' => $faker->sentence,
                'description' => $faker->paragraph,
                'published_by' => $faker->userName,
            ]);
        }
    }
}
Using PHP’s range function we can loop through given numbers. You will think that from where this $faker->sentence, $faker->paragraph and $faker->userName coming from. After creating an faker generator with Faker::create(), you will access all of properties. Check avialable properties here.
Next, you need to tell which file to seed in database. For that, update DatabaseSeeder.php.
/* database > seeds > DatabaseSeeder.php */

<?php

use Illuminate\Database\Seeder;

class DatabaseSeeder extends Seeder
{
    /**
     * Seed the application's database.
     *
     * @return void
     */
    public function run()
    {
        $this->call(ArticlesTableSeeder::class);
    }
}
Thats it! Migrate and seed the database with following command.
php artisan migrate:refresh --seedCheck the articles table into database, you will get 1000 articles with proper data. Using this technique in development mode saves you lots of time.
# Creating Datatable
All things setted up. Let’s use yajra datatables to display articles into page.
Create a controller with the following command and create two methods as below.
php artisan make:controller ArticleController/* app > Http > Controllers > ArticleController.php */
<?php
namespace App\Http\Controllers;
use Illuminate\Http\Request;
use App\Article;
use Yajra\DataTables\DataTables;
class ArticleController extends Controller
{
public function index()
{
return view('articles');
}
public function ajaxArticles()
{
$articles = Article::select(['id', 'title', 'description', 'published_by'])->get();
return Datatables::of($articles)->make(true);
}
}Similarly, create routes to handle these functions.
/* routes > web.php */

<?php

Route::get('/', 'ArticleController@index');
Route::get('/ajax-articles', 'ArticleController@ajaxArticles')->name('ajax.articles');
In last step, create a blade file articles.blade.php with following template.
/* resources > views > articles.blade.php */
<!doctype html>
<html lang="en">
<head>
<meta charset="UTF-8">
<meta name="viewport" content="width=device-width, user-scalable=no, initial-scale=1.0, maximum-scale=1.0, minimum-scale=1.0">
<meta http-equiv="X-UA-Compatible" content="ie=edge">
<title>Yajra Datatables Laravel</title>
<link rel="stylesheet" href="https://cdnjs.cloudflare.com/ajax/libs/twitter-bootstrap/4.1.3/css/bootstrap.css">
<link rel="stylesheet" href="https://cdn.datatables.net/1.10.20/css/dataTables.bootstrap4.min.css">
</head>
<body>
<div class="container-fluid my-5 align-center">
@if(session()->has('msg'))
<div class="alert alert-info">
{{ session()->get('msg') }}
</div>
@endif
<div class="table-responsive">
<table class="datatable table table-bordered table-striped">
<thead>
<tr>
<th>ID</th>
<th>Title</th>
<th>Description</th>
<th>Published By</th>
</tr>
</thead>
<tbody>
</tbody>
</table>
</div>
<script src="https://code.jquery.com/jquery-3.3.1.js"></script>
<script src="https://cdn.datatables.net/1.10.20/js/jquery.dataTables.min.js"></script>
<script src="https://cdn.datatables.net/1.10.20/js/dataTables.bootstrap4.min.js"></script>
<script>
$(document).ready(function () {
$('.datatable').DataTable({
processing: true,
serverSide: true,
ajax: '{{ route('ajax.articles') }}',
columns: [
{data: 'id'},
{data: 'title'},
{data: 'description'},
{data: 'published_by'}
]
});
});
</script>
</div>
</body>
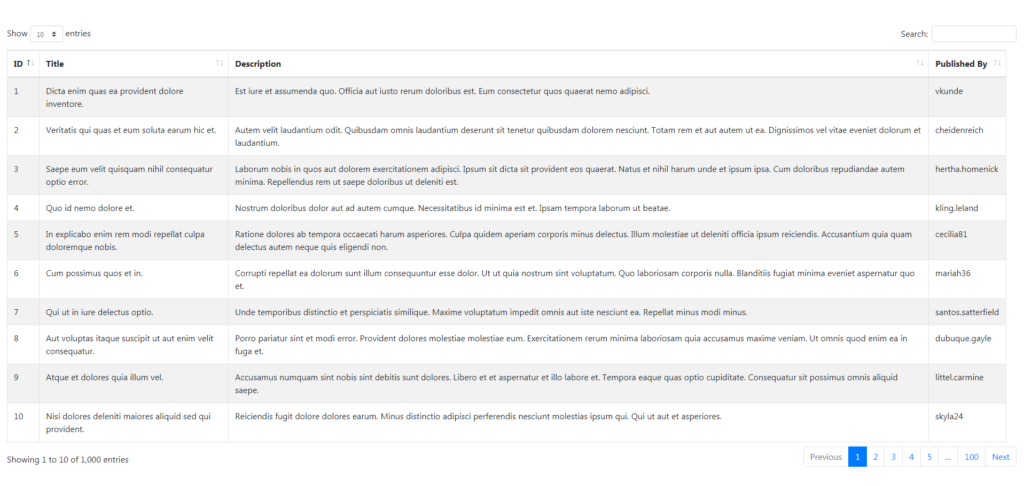
</html>You will have server-side datatable by running your project. Now, you will think about how to add a custom column for the edit or delete button. Super easy. Lets create delete button.
Reopen, ArticleController and update ajaxArticles function.
/* app > Http > Controllers > ArticleController.php */

....

public function ajaxArticles()
{
    $articles = Article::select(['id', 'title', 'description', 'published_by'])->get();
    return DataTables::of($articles)
            ->rawColumns(['action'])
            ->addColumn('action', function($article) {
                return "<a href='route-for-delete' class='btn btn-danger'>delete</a>";
            })
            ->make(true);
}
....
Yajra provides addColumn to add new column with closure function. Remember that if column contains html data then you will need to define that column name in rawColumns function as array. I’m using delete button in each row with column name action.
In last, update articles.blade.php file with new action column.
/* resources > views > articles.blade.php */

<!doctype html>
<html lang="en">
<head>
    <meta charset="UTF-8">
    <meta name="viewport" content="width=device-width, user-scalable=no, initial-scale=1.0, maximum-scale=1.0, minimum-scale=1.0">
    <meta http-equiv="X-UA-Compatible" content="ie=edge">
    <title>Laravel Datatables</title>
    <link rel="stylesheet" href="https://cdnjs.cloudflare.com/ajax/libs/twitter-bootstrap/4.1.3/css/bootstrap.css">
    <link rel="stylesheet" href="https://cdn.datatables.net/1.10.20/css/dataTables.bootstrap4.min.css">

</head>
<body>
<div class="container-fluid my-5 align-center">

    @if(session()->has('msg'))
        <div class="alert alert-info">
            {{ session()->get('msg') }}
        </div>
    @endif

    <div class="table-responsive">
        <table class="datatable table table-bordered table-striped">
            <thead>
            <tr>
                <th>ID</th>
                <th>Title</th>
                <th>Description</th>
                <th>Published By</th>
                <th>Action</th>
            </tr>
            </thead>
            <tbody>
            </tbody>
        </table>
    </div>


    <script src="https://code.jquery.com/jquery-3.3.1.js"></script>
    <script src="https://cdn.datatables.net/1.10.20/js/jquery.dataTables.min.js"></script>
    <script src="https://cdn.datatables.net/1.10.20/js/dataTables.bootstrap4.min.js"></script>


    <script>
        $(document).ready(function () {
            $('.datatable').DataTable({
                processing: true,
                serverSide: true,
                ajax: '{{ route('ajax.articles') }}',
                columns: [
                    {data: 'id'},
                    {data: 'title'},
                    {data: 'description'},
                    {data: 'published_by'},
                    {data: 'action'}
                ]
            });
        });
    </script>

</div>
</body>
</html>
All Done! Thankyou for reading this.

I am extremely inspired with your writing abilities as neatly as with the structure to your blog. Is this a paid topic or did you modify it yourself? Anyway keep up the excellent quality writing, it is uncommon to see a great blog like this one nowadays.
I made it myself to help other developers. 🙂